I’ve migrated this post from my previous blog to try and get all of my zombie makeup effects in the same place. This is from Brighton’s Beach of the Dead 2011.
October meant one thing – zombie time! After having such a great time at last year’s Beach of the Dead, my friends and I were really excited about attending this year. Our zombie wedding theme from 2010 was fun, but we saw a lot of zombie brides that day and wanted to try something a bit more original for 2011 and decided to go as the Zombie Village People.
As you can see from our lineup we were missing a couple of members. Organising a group theme is tricky and our Leather Man, G.I. and Traffic Cop ended up dropping out at the last minute. We were left with Laurie as the cowboy, Roisin as the Indian and myself as the Builder. Later in the day my friend Sam stood in as our Leather Man because she had a leather jacket on. Clearly some people aren’t as dedicated to zombieness as others, but we were determined to make the most of it and we still had a great day.
I put more work into my base coat this year. I used black face paint and purple tones from my bruise wheel to shade around my eyes, contour my cheeks and give my lips a cold dead blue tint. I then coated myself in a thick coat of white face paint and blended the colours together. I picked up some of the purple bruise wheel on my sponge as I layered the white, which created a nice grey blue hue.
In my camp builder outfit I was showing a lot more flesh than last year so I had to paint my neck, arms and legs too. You can see my short shorts in this photo. Thankfully the weather was great for October so I could survive being exposed to the elements for a few hours.
Once my base coat was complete I used my red eyeliner to give my eyes a sinister, unhealthy look, which contrasted really well against the blue and white. I decided to use less latex than last year and created lesions in the usual way by layering it up, ripping it open and then applying reds, purples and finishing up with fresh scab.
I used left over latex from last year and I think this was a mistake as it had a gloopy consistency and went a bit yellow when it dried. It wasn’t as sticky as usual and the finish was more uneven. This wasn’t so bad though as it added to the decaying look. I’ll be sure to use fresher latex next time though.
We had a new kind of viscous blood in our kit this year that was great. It partially dries but remains glossy. It created a great dripping blood effect as it would run off wherever you applied it and then dry in big dangling drips. You can see some of it on my face above and I also had some on my knee.
You can spot us briefly in this video from the day at about 0:44
If you don’t know by now, I love zombies, so I jumped at the chance to take part in Brighton’s zombie crawl, Beach of the Dead. I’d had a lot of fun designing zombie looks for the short film Outbreak, but this was the chance to turn my makeup sponges on myself as I descended on Brighton seafront with my zombie friends.
This was our first year at the zombie crawl as work and other commitments had kept me away in previous years. We opted for a zombie wedding theme. I was the groom (that’s me in the suit) and my bride and I were accompanied by a nun, a vicar and a bridesmaid. Getting ready in the hotel room was hilarious, by the time we were finished the bathroom looked like it belonged in the Bates Motel.
I love working with liquid latex so I decided to go with the broken skin look that I developed on Outbreak, with the addition of some creepy white contact lenses. I also did the makeup for my friends Tam and Laurie, the vicar and nun, after my makeup artist friend (and zombie bride) Roisin gave us a base coat of white with her airbrush kit.
BRAAAAAAAAAAAAAAAINS!!!
I’d spent a lot of time thinking about creating the look for the day, and getting organised early in the morning. What I hadn’t really thought about was the parade aspect of the day. My friends and I were all quite taken aback by the amount of spectators that turned out to watch us zombie our way down to the seafront. It was a bit intimidating having so many people watching me and taking my picture. I’m usually the one behind the camera! Wearing so much makeup felt like a protective layer though, like hiding behind a mask. I got into character and just got on with it and was quite surprised to see pictures of myself popping up online after the event.
Here is one taken by Samuel Justice at the start of the day and another by Dogtemple, which was taken towards the end of the night after peeling had set in! Both photographers have been very kind in letting me repost their work here.
If you’d like to take part in a zombie make-up workshop then please visit my website to find out more.
In my last post I talked about making props for the short film Outbreak with Worthing Youth Media. Now I am going to discuss in more detail how we designed and created specific character looks for our zombies. I’m a HUGE fan of George A. Romero, so working on this short was a dream come true for me.
The first consideration was to populate the film with zombies who represented a cross section of society, the Zombie Apocalypse is coming for all of us, after all. During preproduction for the film I was like Simon Pegg in the opening scenes of Shaun of the Dead, imagining the slow zombification of the world unfolding around me. I started working on a sketchbook of zombie characters, and encouraged my art department team to do the same. In order to create characters, I encouraged the team to consider who this person was before they were bitten, how and where they had died, how long ago they had turned and what their zombie-self might have encountered since as all of these things can be conveyed by the zombie’s appearance.
As we moved closer to the shoot, we began shortlisting our zombie cast, using the action an locations of the script to help in our decisions. With our zombie cast locked down, we started sourcing the costumes that would bring our undead characters to life. Clothes and accessories were then sliced, ripped, sand-papered, burned, dirtied up and covered in blood as we matched the outfits up to our actors.
On the first morning of the shoot, I was the go-to guy for blood. I carried three our four different types of fake blood on set at all times, including two spray bottles that I used to cover actors on set before the director called action. In between takes, my team and I were on hand to reapply blood and keep wounds looking fresh. By the end of the week my hands and arms were stained red up to the elbows.
All of the zombies had a basic look that was consistent. Each zombie was painted white, with a blend of purple and mustard bruise colours around the eyes to create a decaying look. Following that, zombies were given their own individual wounds and grotesqueries. The exception to this rule, were the identical zombie twins, who were given matching mirror image misfortunes. We discussed the use of contact lenses to give the zombies that dead eyed look, however, there were a number of reasons that this wasn’t affordable, practical or safe for use with young children. Instead we used a red eyeliner to give the eyes an evil look. Although the cause of the zombie outbreak is not explained in the film, in my designs for the characters I envisioned it like a disease with the red eyeliner providing a swollen, puffy, infected look.
To add further detail I used latex to create the look of broken skin, burns and lesions. Tested here on a zombie extra. The effect is achieved by building up layers of liquid latex onto the skin and then piercing and tearing it to make holes. These holes can then be worked into with makeup to add colour and definition. I like to use black as a base to create the illusion of depth, and then add a purplish red followed by fresh scab for texture.
Zombie Chef, the script’s most intimidating zombie, required a more complicated look as he is the main antagonist of the film. We wanted to make him look scary and burned, as he met his death in a kitchen.
We started with a typical chef’s costume, which was then distressed by being torn and burnt. We wanted to exaggerate his look to make him quite extreme so we covered the outfit in food stains and blood.
Zombie Chef had one of the most complicated makeup looks in the film, made all the more difficult because his scenes were shot over two days, meaning that the makeup had to last a full day’s shooting before being recreated as exactly as possible the following morning.
I started by giving him a foundation of white skin, with purple around the eyes. I find that the eyes usually need retouching again at the end, but it helps to have a foundation to work with. I then covered the actor’s face and neck with several layers of liquid latex. The operation was time consuming as each layer of latex needed time to dry before another could be applied.
Having achieved a good layer of latex, I then ripped holes of varying sizes, using a pencil to break the latex. We took photographs of every stage so that the look could be recreated the next day. When creating the look for the second time, I referred to the previous day’s photos and used the pencil to draw onto the latex so that I knew exactly where the holes needed to be.
The next job was to add definition and shading to the holes using a variety of colours. We wanted to create a charred skin effect and so we used a lot of reds and purples to make the skin look scorched and sore, then yellow and green hues as highlights around the edges. Finally, we added texture to the wounds using fresh scab again. I love using fresh scab, it has a consistency like raspberry jam and it sticks to the skin and slowly dries to look like a nasty scab or graze.
The longest makeup job on set had to be the Old Lady Zombie as we needed to create a combination of zombie and ageing makeup. We decided that not only was Old Lady Zombie old, but she’d been a long time dead so we wanted her to look really decayed and grotesque.
I started out in the same way that I approached Zombie Chef’s makeup, starting with a white foundation. This time instead of applying the liquid latex directly onto the skin, I used it to apply small pieces of tissue paper all over the actress’s face and neck. As it dried, this created a leathery, wrinkled skin effect. To give a sense that her skin was rotting I then blended white, yellow and green makeup for an all over tone, before using blues and purples for depth and shading. Finally, to add to the aged and rotting effect, I used a fine paintbrush to paint veins all over her face and neck. Red eyeliner was used again to give the eyes an evil look.
As well as making up her face I also applied makeup to the actress’s hands and arms, as I knew that there would be a shot in which this character reaches through the letterbox. I covered the actress’s arms in latex, before using a sponge to apply greens, yellows and browns for a mottled, rotten look.
Old Lady Zombie was a comedy character in the original script, and although her scene was rewritten, we still wanted to keep the same sense of fun in her overall look. The original script described her as a WI member. We chose a matching outfit for her with an ostentatious hat. The costume was then ripped and covered in the customary amount of blood, before the addition of dirt and flowers to give her that ‘Just Dug Up’ look.
It was a shame not to see more of the character in the finished film, but that’s life in the art department!
The final makeup challenge for this film was a zombie movie staple – the zombie bite: a protagonist is bitten by a zombie and we watch their slow transformation into the undead. This was my homage to Dawn Of The Dead‘s Roger. What was fun about this effect was that there were stages to the makeup that we enhanced from scene to scene.
We don’t see Derek get bitten by the zombie. First, we see that Derek is feeling unwell. This shows up better on video than as a screenshot, so check out the movie below to see the full effect. We wanted to introduce elements of the zombie design slowly and subtly, hinting at what’s yet to come. I gave the actor a light covering of the white zombie foundation, enough to make him look unnaturally pale. I also wanted to show that the change was already beginning, and so I used a mustard colour around his eyes. I thought that yellow would give the actor a sickly hue, and it is also a colour that, once blended with different shades of purple, contributed to the look of the other zombies in the film. I then created the appearance of sweat by applying glycerine with a stipple sponge. This had to be reapplied between takes to give him an unhealthy sheen and a feverish look to show signs of the infection.
At this point Derek’s zombie bite is revealed to the audience. This is the only human injury we see in the film and we wanted it to be shocking. We wanted it to look serious, definitely an injury that could kill if not seen to immediately. I went about this in the same way as the other wounds, but on a larger scale. First I used black and various purples and reds to create a bloody looking area. I created two small bones using bone wax, which were attached to the skin and covered with a layer of liquid latex to keep them looking clean and white, so that they wouldn’t soak up any of the blood. I then used tissue paper, building up a layer of latex skin over the injury which was then ripped open to expose the wound and bones beneath. I used wound filler to add texture and extra gore to the wound, and of course, plenty of fake blood. The ‘skin’ was blended into the rest of the arm using a natural foundation. As this wound was the source of the infection we wanted to make it look as if it was already rotting, so we blended yellows and greens into the skin. To further represent the zombie virus spreading into the body I painted a vein effect spreading out from around the wound.
The final stage of Derek’s transformation was to reveal him as a zombie in the climactic scene. This involved a slightly different design from our regular zombies because Derek was a protagonist so we wanted to show him as a tragic, rather than as a scary zombie. Also because Derek had only just turned, he would not look as rotten or weathered as the other zombies, and we couldn’t cover him in injuries, because he hadn’t sustained any beyond the bite to his arm. I gave him the same white face as the other zombies, then exaggerated the lines and features of the actor’s face and neck with blue shading, which I blended into the white to make the colour less bright. I then increased the yellow shading around his eyes and layered purple over it. Building on the idea of showing the virus’s spread, I designed Derek’s eye makeup to mirror the veiny style of his wound, spreading out through all of the creases around his eyes.
I love zombies, and I especially love doing zombie makeup, so watch this space for more zombie experiments and to see me as a zombie too. I also run workshops in Special Effects Makeup so if you’re interested in having a go yourself, take a look at my website.
During my time working with Worthing Youth Media we produced the short zombie film Outbreak. The film was funded by First Light, the UK Film Council’s initiative for young filmmakers.
The film was crewed by the members of Worthing Youth Media, who were given assistance and training by mentors such as myself. For this production, I was in charge of the Art Department – running workshops in Production Design for a small team of young people, as well as sourcing locations, props and costumes, dressing the sets and working as a Makeup Artist on the shoot.
My favourite part of this job was working with the team to design the various zombie characters who would populate the world of the film. I’ll talk in more detail about this in my next post, as right now I want to focus on the props that I made for the film.
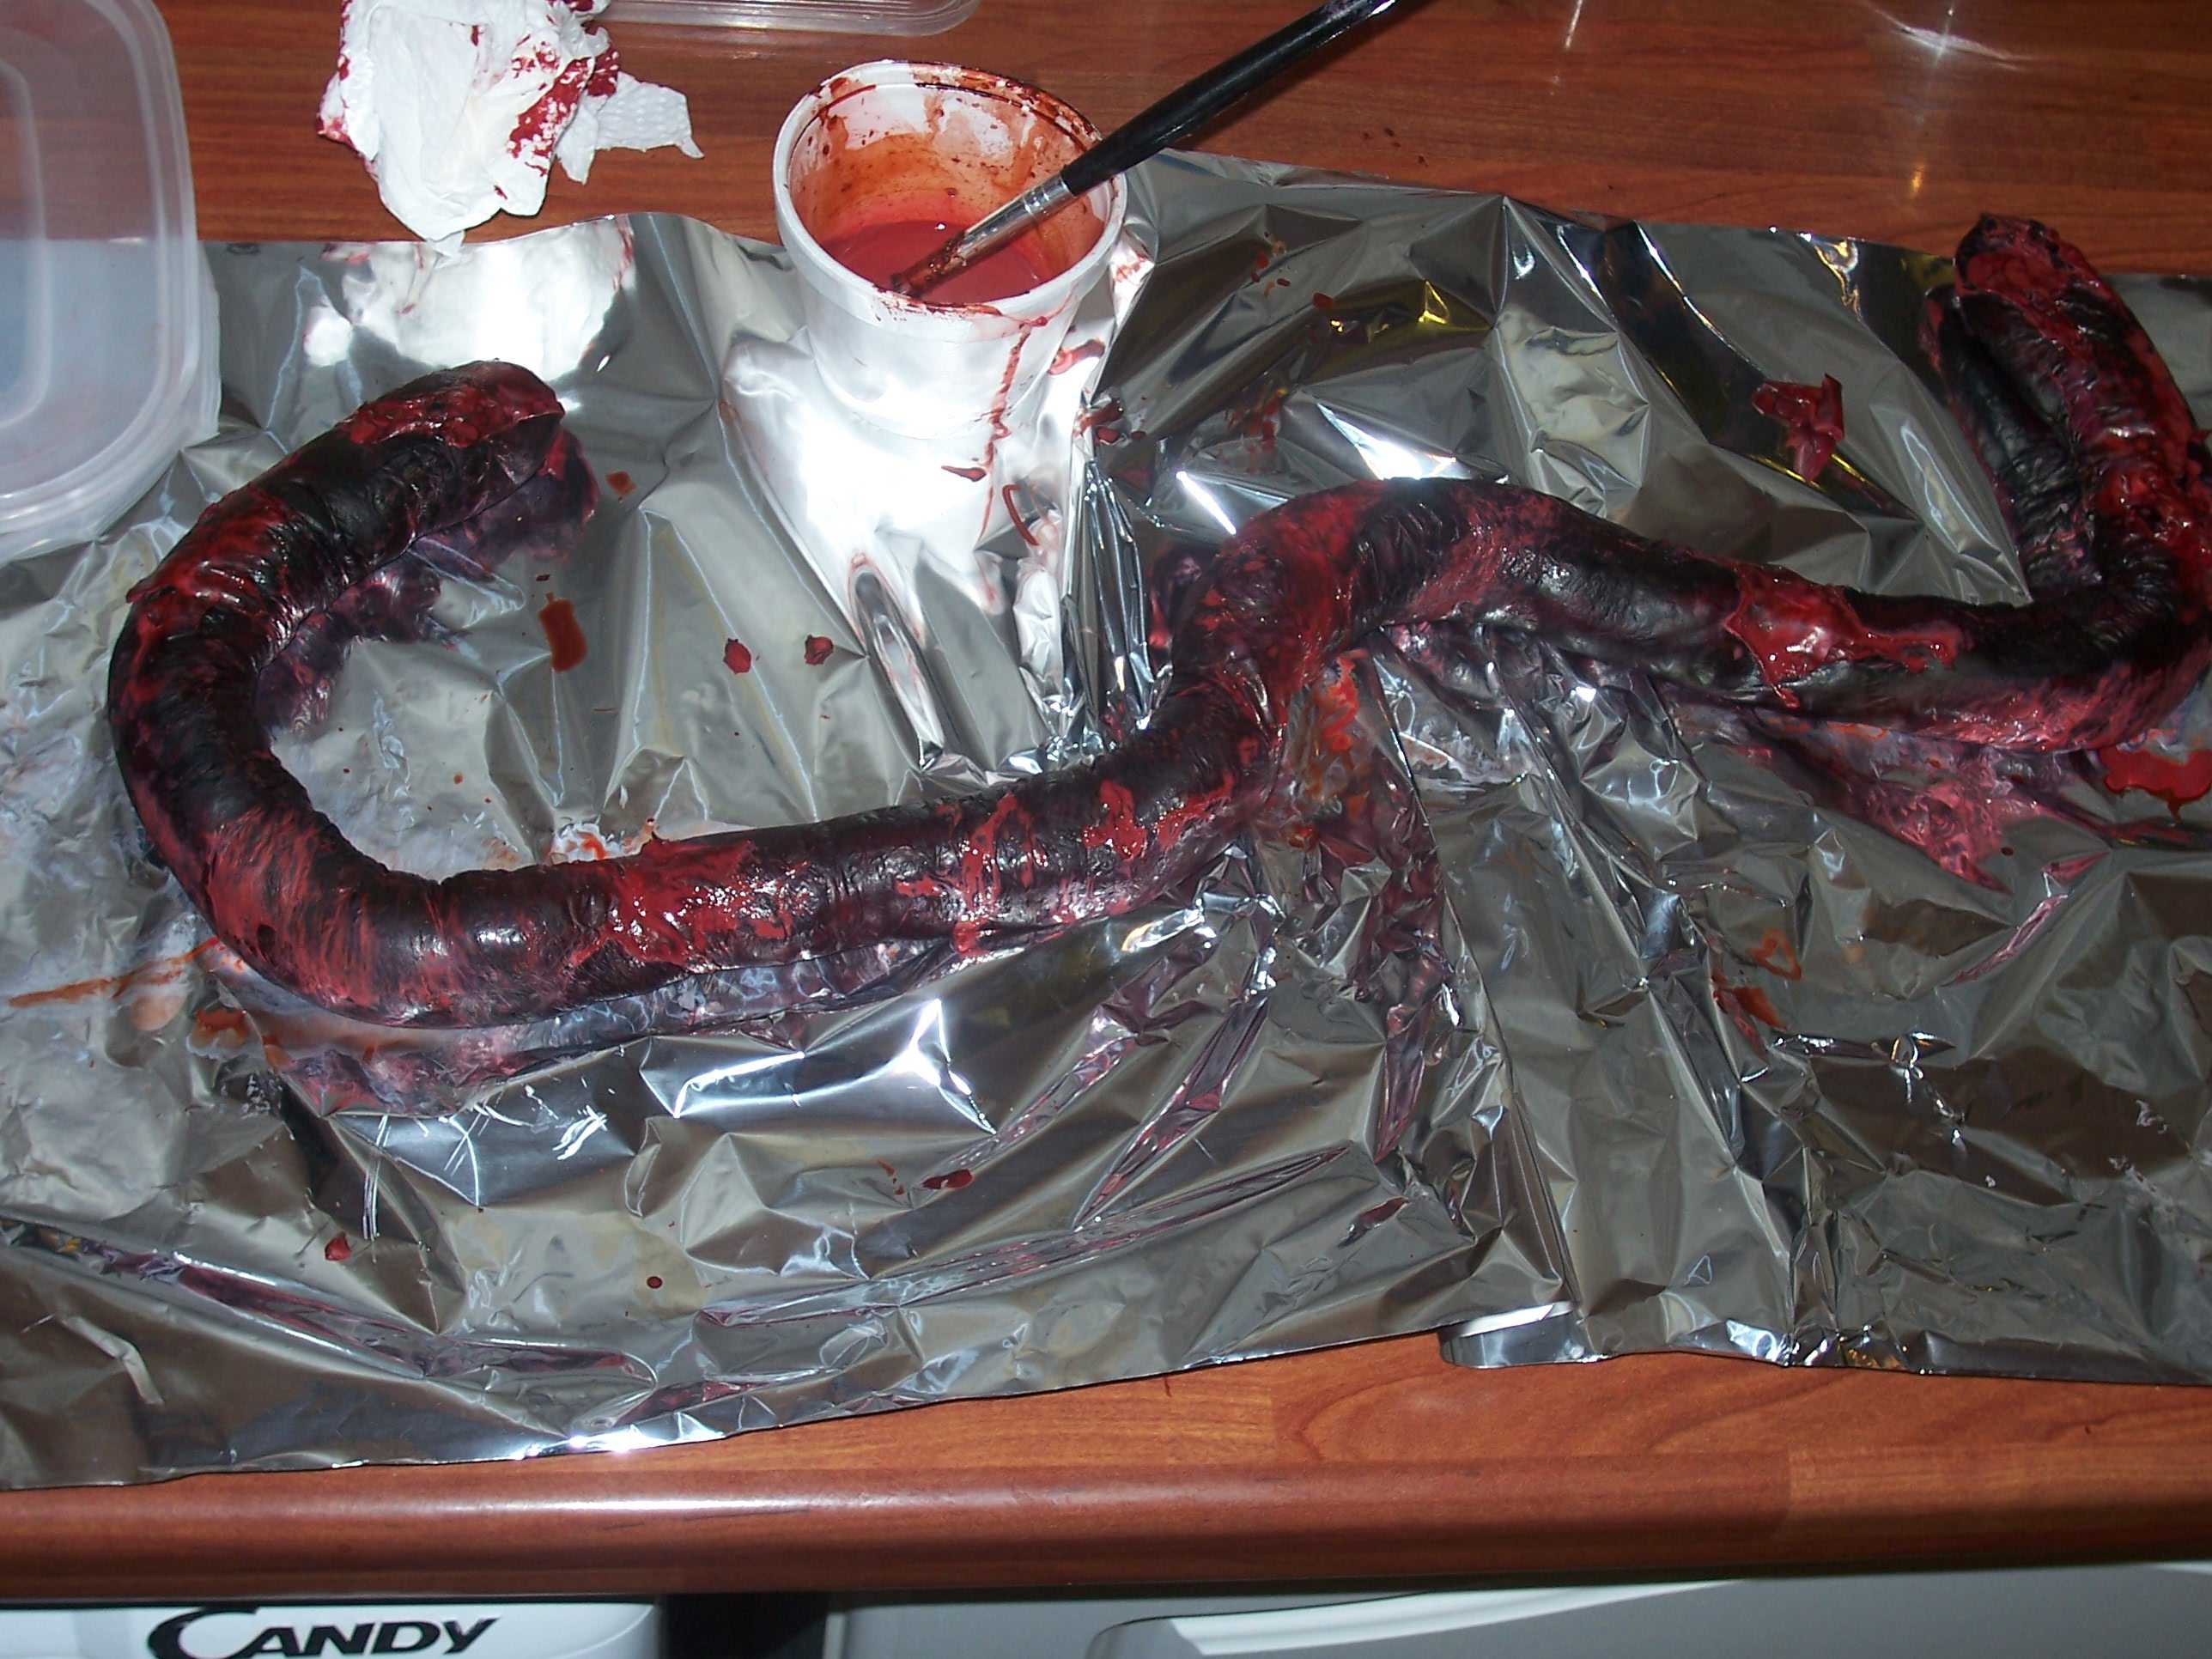
Obviously when you deal with zombies, you expect a certain level of gore. For certain scenes, I had to create flesh for the zombies to eat.
The first challenge, was creating entrails for our Zombie Brownie to eat in the opening scene (pictured above.) This led to some interesting home experiments!
The obvious choice was sausages. I purchased several links of sausages from the butcher and untwisted each link to make one long sausage. I then soaked the sausages in food dyes, deciding after a few tests that a combination of red and black would look just disgusting enough, and contrast well against red fake blood. Then, to add texture, I mixed food dye into liquid latex and painted it onto sections of the entrails to look like fatty tissue. I love working with latex as there are so many things you can do with it. Finally, the entrails were placed into a box of girl scout ‘cookies’ made by the props team, which we filled with blood on location.
In a later scene in the film, the heroine’s dog gets eaten by the Twin Zombies.
We see them surround the dog, and then when they appear in a later scene, they are chewing on the dog’s severed leg. It was my task to add gore to our dog’s leg prop, and create prop flesh for the zombies to chew on.
Again, I used liquid latex to create the effect. By layering the latex on tin foil I created strips, which I then treated with vinegar to create texture. The vinegar causes the latex to wrinkle, bubble and contort. The result was lots of twisted, lumpy bits of rubbery flesh, which I soaked in food dye and then arranged and layered up on the dog’s leg, using more coloured latex to attach it all as it acts like glue. I also twisted some of the strips to create sinewy tendons. Once we added some fake blood on location, it was ready for filming.
The rubbery texture of the latex was perfect for the scene, as it allowed the twins to bite and stretch the fake flesh, even snapping bits off. It also produced some fantastic squelching noises. I also created a small piece of flesh for Zombie Chef to chew on in the same scene, using the same method but with less texturing effects. Here’s how it all looked on set –
The film was nominated for Best Drama at the First Light Awards 2010. You can see the finished product below. If you want to just skip to the gory bits, you’ll find the entrails at 0:50 and the dog eating at 3:05. I’ll be talking about the various makeup effects created for the film in my next post.
I’ve been writing and making films since childhood. I remember the first time my sister and I got our hands on a friend’s camcorder. We created simple in-camera tricks such as making people disappear and reappear and turn into different objects. It was like performing a magic trick. Inspired by Sesame Street and the Adam and Joe show, my childhood experiments in video progressed to using stuffed animals and toys to recreate dramas and tell stories of my own. In my teenage years, like a typical adolescent, mortality became a fascination for me. I started making campy fake-blood-soaked horror shorts with friends, running around the South Downs screaming, with rusty shears and other improvised weapons.
I can assure you that all of these early films were terrible, but those elements are still present in my work today. I am drawn to the illusion of cinema and the opportunity to create effects. As an animator I enjoy giving life to puppets, toys and inanimate objects, essentially using the same stop/start technique that my sister and I employed to make ourselves disappear from the frame as children. I still love creating horror effects and channel this into experiments with special effects make-up. Horror has taught me how to create tension and suspense, which was a great entry point to understanding how to provoke a range of emotions in an audience.
Leading workshops was something that evolved quite organically for me. I started learning about production and script writing when I joined my local youth theatre. I originally had ambitions to act, but soon became far more enchanted with the world backstage than on it. I got involved in making props and costumes. I started devising and writing material. Then, around age 14, I tried my hand at leading workshops and this is when I was able to get my hands on video cameras again. At first we produced in-camera edited films but then when the group acquired a laptop I started learning how to edit and how to shoot for the edit. I went on to study film, media and photography academically, but it was through the theatre group that my education began, and years later, where I got my first paid work as a workshop leader.
Being part of a community group was not only a huge support to me throughout my childhood but also a creative playground where I was able to learn, collaborate and develop throughout my formative years. Perhaps this is why I try to keep community at the heart of what I do. I believe that film and animation can provide all kinds of people with a creative and positive outlet, to help them develop their own voice in the same way that I did. As such, I enjoy working with different communities and on projects that have a social benefit.
Coming from a background of low budget theatre and filmmaking, I am used to getting my hands dirty on set and occupying several roles at the same time. This hands-on attitude has given me the opportunity to learn about the process of filmmaking from a variety of different perspectives within development, production and post-production. It has also enabled me to experiment with production design, props and puppet-making, special effects makeup and set building.
I am an avid film fan who loves to watch, make and talk about films. I’m a big fan of innovative writers and directors like Wes Anderson, Michel Gondry and Charlie Kaufman. I have a passion for film history and silent cinema. I love science fiction, monster movies, fantasy and horror films. I am definitely drawn to the dark side, so filmmakers like Terry Gilliam and Tim Burton are a big inspiration as well as animators like Jan Svankmajer, Jiri Trnka, and the late great Ray Harryhausen.
I love animation, especially when it gives me the opportunity to create strange characters. It takes a great deal of patience and attention to detail, but it’s those details that I love to get lost in, like how a character is going to move and perform or what they are going to sound like. Watching your animation come to life is like watching magic happen in front of your eyes. The first time you watch your work back, and see your characters move as if they have a life of their own, it’s incredible. It’s so much fun to introduce new people to animation, and see that same reaction in them.
I have a lot of ambitions – one of them being to build my own production company from the ground up. I’m just starting out on that journey, but I already feel I’ve achieved my most important goal of being able to do something that I love for a living. I am learning every day – about myself, about film and about running my own business. I plan to share these experiences through this blog and hopefully interest and entertain along the way. I’m always open to conversations and opinions, so feel free to comment, critique and join the discussion.


 As you can see from our lineup we were missing a couple of members. Organising a group theme is tricky and our Leather Man, G.I. and Traffic Cop ended up dropping out at the last minute. We were left with Laurie as the cowboy, Roisin as the Indian and myself as the Builder. Later in the day my friend Sam stood in as our Leather Man because she had a leather jacket on. Clearly some people aren’t as dedicated to zombieness as others, but we were determined to make the most of it and we still had a great day.
 Once my base coat was complete I used my red eyeliner to give my eyes a sinister, unhealthy look, which contrasted really well against the blue and white. I decided to use less latex than last year and created lesions in the usual way by layering it up, ripping it open and then applying reds, purples and finishing up with fresh scab.
 We had a new kind of viscous blood in our kit this year that was great. It partially dries but remains glossy. It created a great dripping blood effect as it would run off wherever you applied it and then dry in big dangling drips. You can see some of it on my face above and I also had some on my knee.
 You can spot us briefly in this video from the day at about 0:44